7 Steps to Create an API in Rails
It’s easier than you think!
Creating a basic API with Ruby on Rails is a quick and simple process. So let’s dive in!
Make sure that you have Rails installed. To do so, run gem install rails.
Step 1: Create your directory
In your terminal, run rails new [name] --api.
The [name] will be your Rails directory name. In this article, we’ll walk through creating an example case together. We’re going to build a basic API containing data about forests and their trails.
Thus, we’ll run rails new forest-trails --api.
Note: this example illustrates a one-to-many relationship. More on relationships in step 5.
Step 2: Create your resources
Run rails g resource [name] [attribute] [attribute].
In our example case, we’ll create two resources: “Forest” and “Trail”. The [name] spot should be populated with your desired database table name. The [attribute] spots should be populated with the attributes (think database table columns) that your resource needs.
In our example, we’ll first run: rails g resource Forest name state.
Next, we’ll run rails g resource Trail name state.
Note: the default data type for attributes is a string. You’ll need to tweak your syntax if you want a different data type. E.g. rails g resource Trail name state miles:integer.
Once you create your resources, controller files (inside “app” -> “models”) and migration files (inside “db” -> “migrate”) will be generated.
Step 3: Populate your seeds

To populate your seeds, navigate into the “db” folder and open up “seeds.rb”.
First, we’ll put Forest.destroy_all and Trail.destroy_all at the top. This will reset our seeds if we restart our program.
We’ll set each seed to a variable (e.g. forest1 and trail1), and then we’ll use the .create method and pass in our resource attributes. For example, forest1 = Forest.create(name: "Black Forest", state: "Colorado").
Note that when creating the seeds for the many class, you need to include the id of it’s related one class. For example, trail1 = Trail.create(name: "Section 16", miles: 4, forest: forest1).
Step 4: Run your migrations
Since we have a one-to-many relationship, we need to tweak our many migration file. In our trails migration file, we’ll add t.references :forest, null: false, foreign_key:true.

Run rails db:migrate. Note that if you ever need to step backward (for instance, if you needed to add an attribute), you can run rails db:rollback.
Step 5: Set up your associations

We’ll now set up our associations in the forest.rb and trail.rb files inside “app” -> “models”.
In our case, one Forest has many Trails and many Trails belong to one Forest. Thus, all we have to enter inside the Forest method is has_many :trails. Inside the Trail method we’ll enter belongs_to :forest.
Note: this step applies when you have multiple resources that relate to one another. In our case, we have a one-to-many relationship. You could have multiple resources in a many-to-many relationship, or even just a single resource (thus no relationship and no associations needed).
Step 6: Write your routes
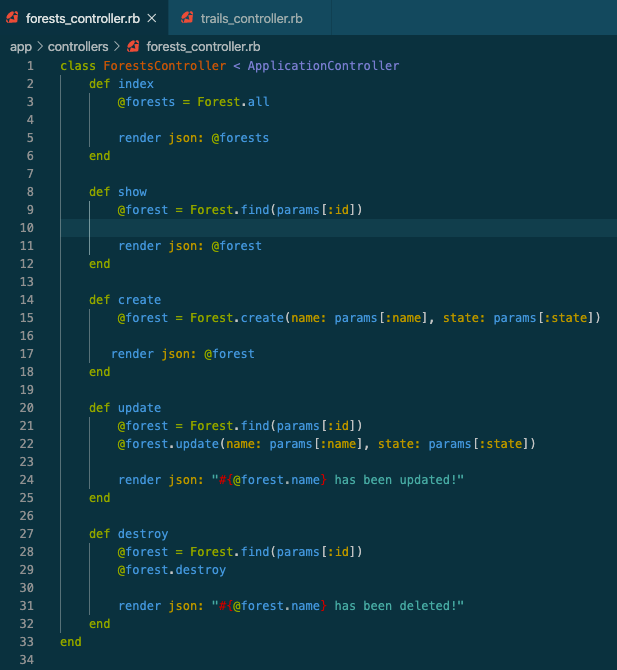
Writing routes can be the trickiest part. We’ll navigate into the “controllers” folder and write routes in both forests_controller.rb and trails_controller.rb.
In the image above, we have full CRUD (Create, Read, Update, Destroy) methods. Whether you need all of these methods or not depends on how you intend to use your API.
Step 7: Run your seeds
Finally, run rails db:seed!
Step 8: Cors*
*This step is only necessary if you intend to connect your API to a frontend.
First, open up your gemfile and uncomment gem 'rack-cors' (line 29).
Second, navigate to “config” -> “initializers” -> cors.rb. In here, uncomment lines 8–26. Change line 10 from from origins 'example.com' to origins '*'.
Voilà! You now have a basic API created in Ruby on Rails. It’s as simple as that!
There is so much more that you can do with Rails, but this is a great foundation.
Run rails s to start your local server. Consider downloading Postman to check that your CRUD actions function properly.
Happy coding!