Create An Advanced CLI — With TypeScript
Already know how to make a simple CLI? Increase your knowledge with this article
This article is for people who already have very basic experience with building CLI’s, we are going to make a small version of the CGX CLI and use the same folder structure. The CLI does the following thing;
“Generate all the recommended markdown documentation (pre-filled) for the Github, Gitlab and Bitbucket community standards”

The user will get a question with a list of options, choosing an option will lead to different outcomes.
Notes:
— There will be some overlap with the setup in a previous article I wrote about making a small ‘pizza’ CLI in TypeScript.
— Every file mentioned in this article has a link to the full/original file.
Project setup
First, we going to initialize a package.json with npm init. You can choose a name, author, version, description, keywords, and license.
dependencies
- figlet — Get a nice ASCII art from a string
- inquirer — A collection of common interactive command line user interfaces.
- fs-extra — fs-extra contains methods that aren’t included in the vanilla Node.js fs package. Such as mkdir -p, cp -r, and rm -rf.
- types/fs-extra — TypeScript definitions for fs-extra
- inversify — A powerful and lightweight inversion of control container for JavaScript and Node.js apps powered by TypeScript.
- kleur — The fastest Node.js library for formatting terminal text with ANSI colors!
- reflect-metadata — Polyfill for Metadata Reflection API
- tslib — Runtime library for TypeScript helper functions
We need to install all our dependencies:
npm i figlet inquirer fs-extra @types/fs-extra inversify kleur reflect-metadata tslibdevDependencies
- types/node — TypeScript definitions for Node.js
- types/inquirer — TypeScript definitions for inquirer
- types/figlet — TypeScript definitions for figlet
- liftr/tscov — Check the type coverage of any TypeScript project with this easy npm package
- ts-node — TypeScript execution environment and REPL for node.js, with source map support
- typedoc—Create api documentations for typescript projects.
- typescript — TypeScript is a language for application scale JavaScript development
Followed by installing our devDependencies:
npm i @types/node @types/inquirer @types/figlet @liftr/tscov ts-node typedoc typescript --save-devBin and main
In our package.json we need to set the entry point of our app (main and bin). This will be our compiled index.js file in the lib folder: ./lib/index.js .
advanced-cli is the command which you use to eventually call you CLI.

Scripts
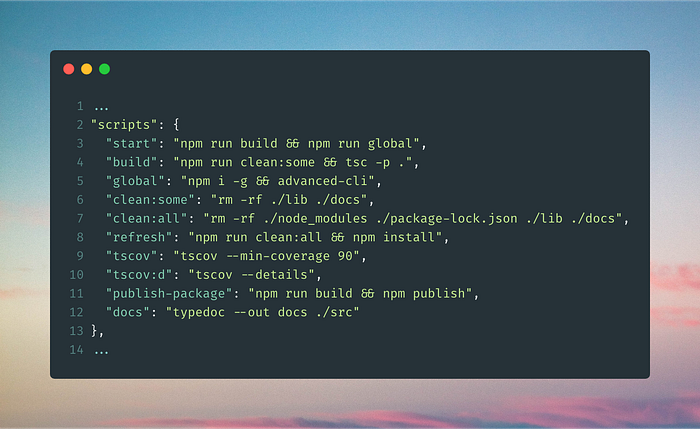
Now we need some scripts to make it easy for ourselves. We have ten scripts:
npm start—runs ourbuildandglobalscript together. Use this to start your CLInpm run build—runs ourclean:somescript and transpiles our TypeScript files to JavaScript files inlibfoldernpm run global— installs our CLI globally and runs the CLInpm run clean:some—removeslibanddocsfoldersnpm run clean:all—removesnode_modules,package-lock.json,libanddocsfolders and filenpm run refresh—runs ourclean:allscript and runsnpm installnpm run tscov—checks for at least 90% type coveragenpm run tscov:d—see missing type coveragenpm run publish-package—runs ourbuildandnpm publishscriptsnpm run docs—generates automated documentation indocsfolder
Write the following into the package.json:
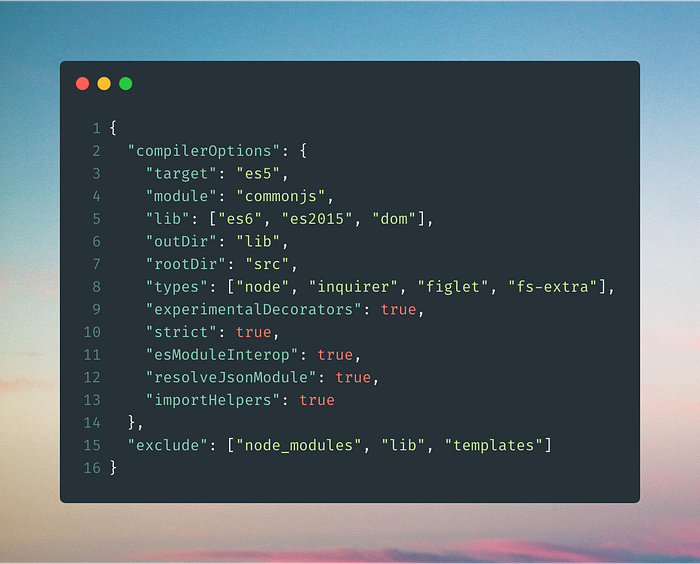
TSconfig
For our CLI we some TypeScript configurations set in a file named tsconfig.json, create this file in the root and write the following configurations into it:
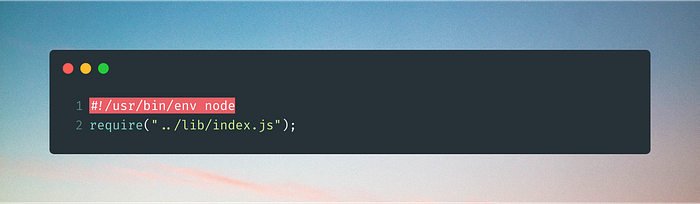
Environment
Create a file named advanced-cli in a folder called bin. With this content:
Coding time!
Folder structure — 1
Make a src folder with the following folders in it:
- models
- questions
- templates
- utils
Also make the following files in the src folder:
- index.ts
- cli.ts
Models — 2
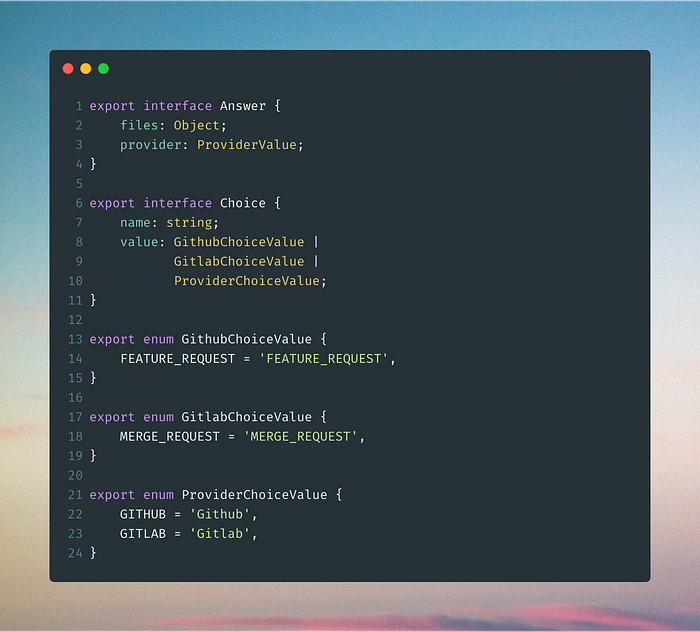
Next we are going to start making some interfaces and enums inside our models folder, in the file named answer-choice.ts. I’ve chosen for the enums instead of constants, because of the properties in it have similarities with other properties. Therefore should be grouped together. The name of the Answer and choice interfaces are self-explaining.
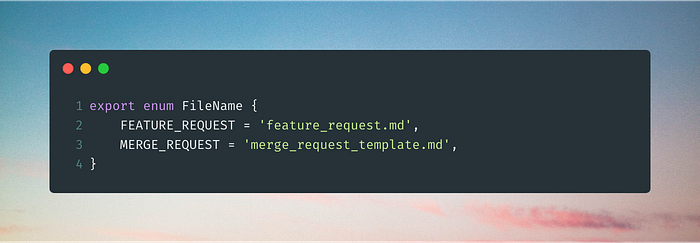
The next file; filename.ts contains the filenames including their extension. In this case .md for markdown.
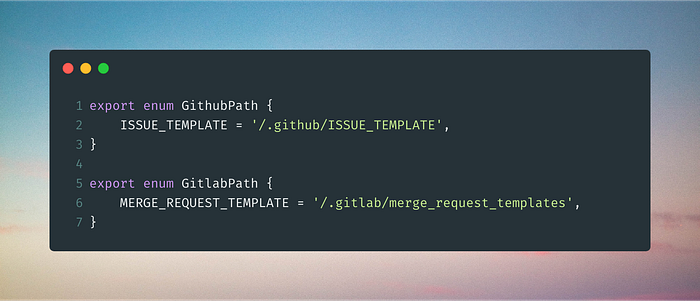
Our last file; path.ts does have the specific paths of where the file needs to be generated in. This is different for gitlab and github.
Questions — 3
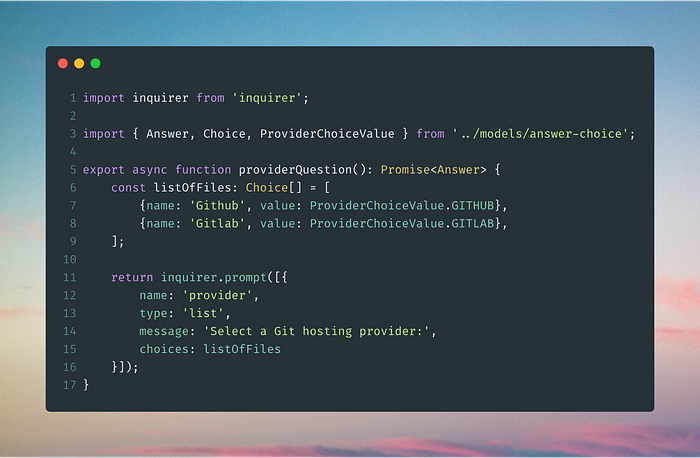
Now we are going to use our enums and interfaces in our questions. Create a file named provider.question.ts inside our questions folder. Import inquirer, this provides us to ask questions in the command line and take actions based on an answer. We have an async function that contains a list and a prompt. It returns an answer.
Create another file called gitlab-file.question.ts:

And the final question file called github-file.question.ts:
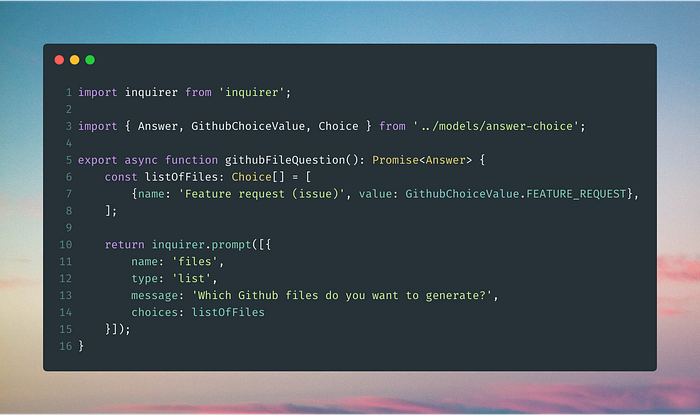
When you have more files per provider, you can now easily add them to the listOfFiles.
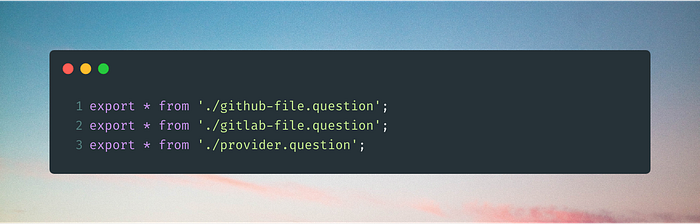
Export the questions in an index.ts file:
Utils — 4
Optional: utils are optional. In my own project I used one util to check if a file/folder already exists, if not create a file/folder. Another util was for reusable and ‘pretty’ console logs (error, success, info, etc.). They can be found here.
Templates — 5
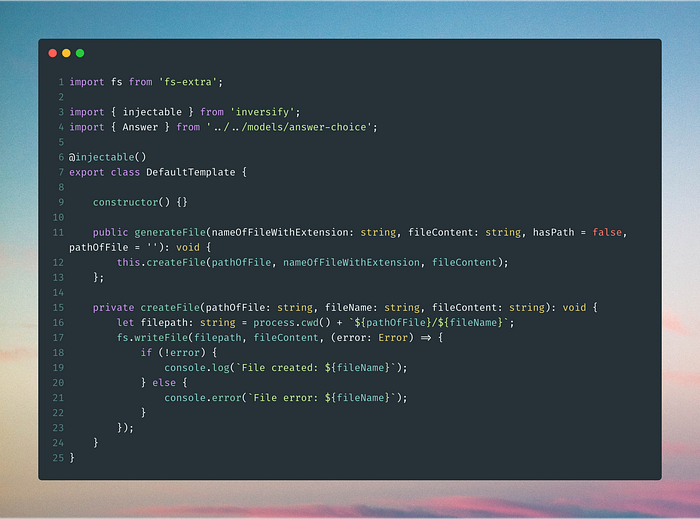
Inside our templates folder we create a folder calleddefault . Inside the default folder we create a file default.template.ts . As the file name is saying, this will be our default template where different files will be generated. We make use of dependency injection withinversify. Our template can be Injected in to other templates because of the @injectable decorator. To create a file on your local machine, we use fs.writeFile from fs-extra.
Note: the original generateFile method contains if file/folder exists or not and option to overwrite files.
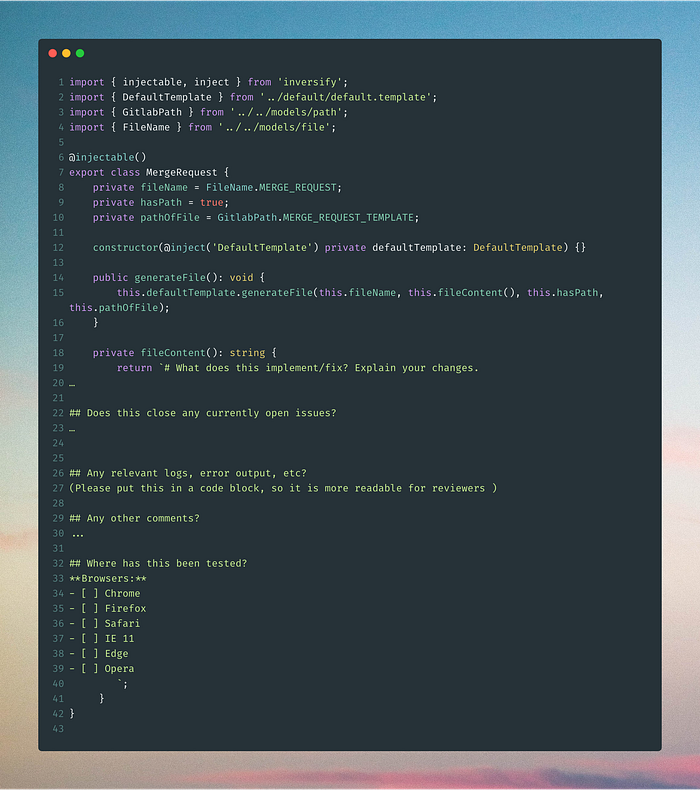
Create another folder in templates called gitlab. Inside this folder create a file called merge-request.template.ts. In our template class we have three properties;
- fileName — we use our previously made enum for our file name with extension
- hasPath — set to true if the generated file should be not in the root of your project
- pathOfFile — specify the path of the file where it should belong
We again make use of the @injectable decorator, but now also of the @inject decorator to inject our default template.
A public method where we call the public reusable generateFile method of our default template. And a private method where we paste our markdown file content.
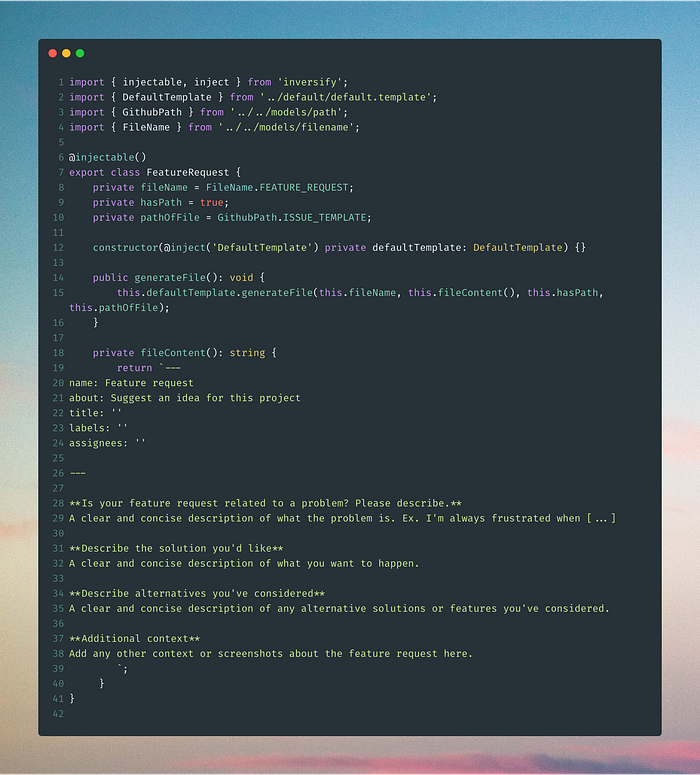
Next in our templates folder create a folder called github. Inside this folder create a file called feature-request.template.ts. This file is very similar to the previous one. But has different property values and file content. We can now easily make more templates for future files.
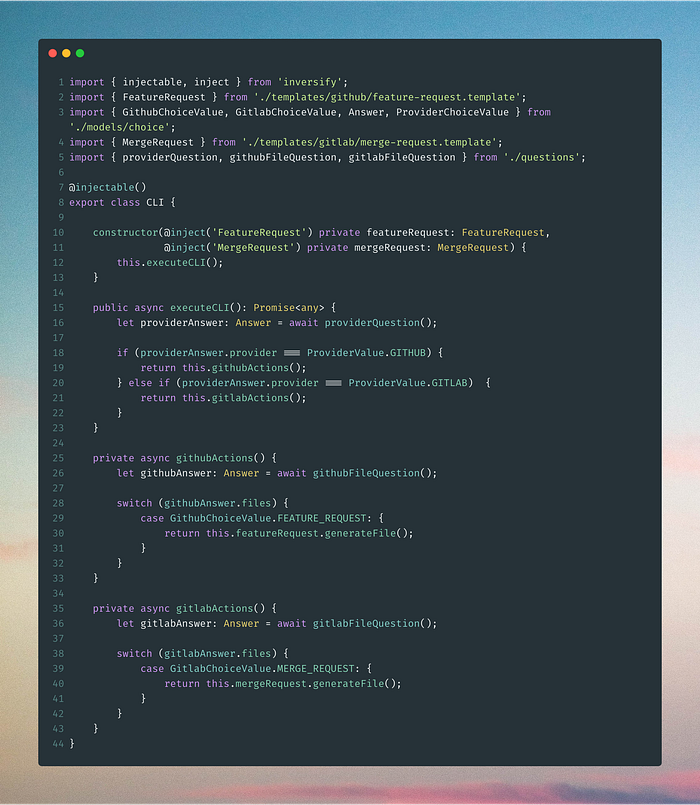
cli.ts — 6
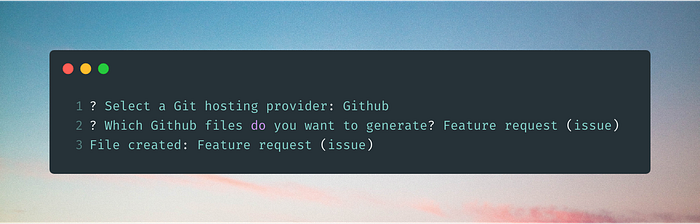
The second to last file is cli.ts. We are injecting our two templates in the constructor and call the executeCLI method. In this method we ask the user about which provider he want to choose. If he choose for Github, then our githubActions method will be called. In here the second question is asked; which file a user want to generate. In this case we only have one file. After choosing the file it will be generated. The same applies if we had chosen Gitlab.
index.ts — 7
Our final file index.ts, is where our CLI is initialized. We need reflect-metadata for the custom decorators used in this project. The index function contains a container, to this we bind all the classes (which contain the injectable decorator) as a singleton scope. At the end we return the CLI where our questions will be asked.
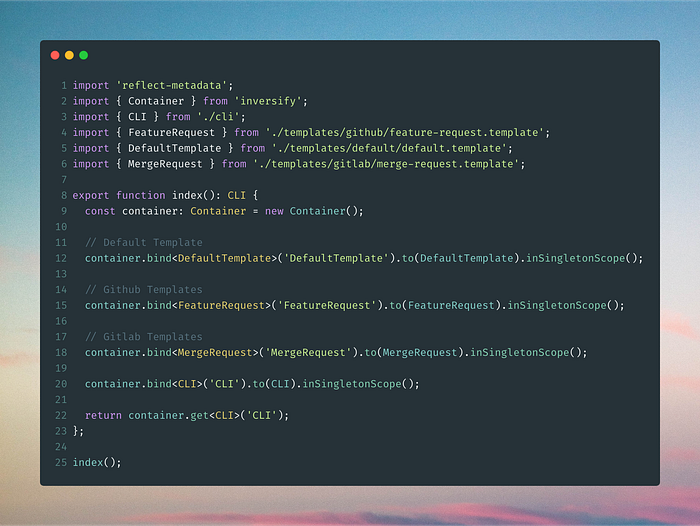
If we now run npm start we should get two questions. After answering these we now have a generated file inside our local project