Dual Booting Windows 10 with Ubuntu — Mission MSI
A complete guide to owning the best of both operating systems.
Linux is the preferred (also my favorite!) operating system for Machine Learning. I decided to install Ubuntu 16.04 alongside Windows 10 on my brand new MSI P65 Creator 8RE with Nvidia GeForce GTX1060 graphics processor, 16GB RAM, and 512GB SSD to kick-start my career in the field of Data Science.
My goal was to exploit the capabilities of the GPU while enjoying recreation on Windows. Little did I know I had to spend two sleepless nights coupled with some anxiety to accomplish this. It wasn’t a cake-walk as I thought. I was stuck with errors along the way and had to storm the world wide web looking for solutions. I wished there was one consolidated blog that had the entire process documented. So, here it is!
PART 1: PREPARATION
- Prepare to fallback (Optional, but recommended):
Take a full backup of windows 10 on an HDD that includes your Windows OS, apps, files, and your settings. If something goes wrong, God forbid, this would save your day.
2. Bootable USB:
Download Ubuntu desktop iso on your laptop. You will need a 4GB USB flash drive to store the Ubuntu iso image. Plug in the bootable USB and burn the iso image to it.
If you wish to use a Pendrive instead, I suggest using Rufus, open-source software that creates bootable USB drives. Here is a quick guide that helps you through.
3. Disk Partition:
The size of Hard disk you should be allocating for Ubuntu depends on your needs. If your laptop has additional drives with the intended space, you can pick any one of them to install Ubuntu. If not, you can go ahead with the C drive.
Type Create and Format Hard Disk Partitions in the search charm and follow the result that shows up. Right-click on the drive you want to use and click on shrink volume. This creates “free space” required for Ubuntu Installation.

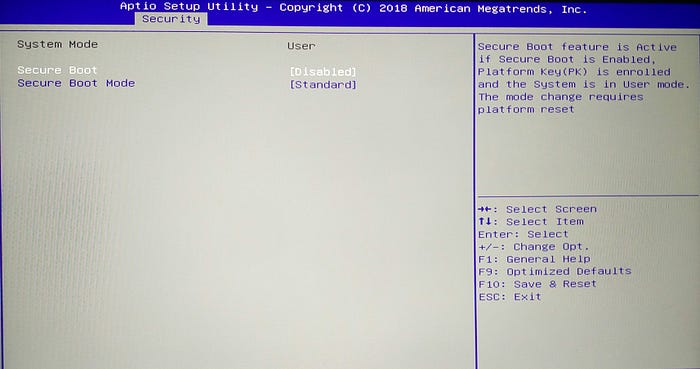
4. Disable UEFI Secure Boot:
Secure Boot prevents booting unsigned operating systems. It allows booting only systems that are signed with a key that is stored in UEFI. However, modern versions of Ubuntu will boot and install normally with Secure Boot enabled. It would be safer to have it disabled than running into problems during installation.
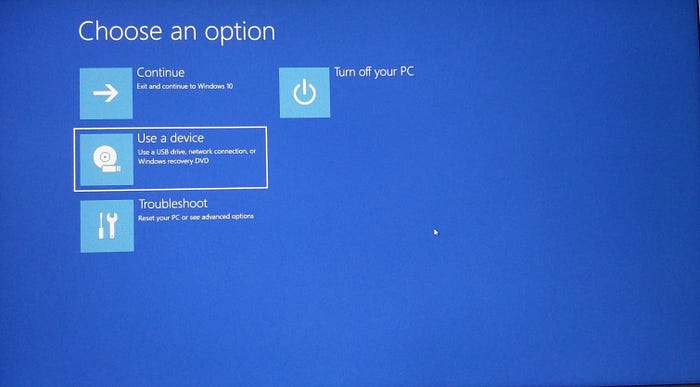
Go to Advanced Startup Options from the search charm and in the Change advanced startup options section, click on Restart Now.
You will be presented with a special menu, select Troubleshoot > Advanced Options > UEFI Firmware settings. This will reboot your laptop and take you to the UEFI settings.
Once you’re on the UEFI utility screen, move to the Security tab on the top menu and go to Secure Boot option using your arrow keys and then use + or - to change the value of Secure Boot to Disabled. If you do not find this in the Security tab, look for it on the Boot tab.

5. Disable Fast Startup:
To disable Fast Startup, type power and sleep settings in the search charm and follow the result. Select the Additional power settings link on the right side of the screen. The Power Options window should appear. Click Choose what the power buttons do from the column on the left. Scroll down to Shutdown settings and uncheck Turn on fast startup.
PART 2: INSTALLATION
Now that you are all set for the installation, plug in the USB bootable stick that you created in step 2 of part 1.
- Boot from within Windows:
Make sure that the device connects to the Internet automatically on boot up. Go to Advanced Startup Options from the search charm and select Restart now. You will be presented with a special menu, select Use a device.
Your system will reboot and present the grub boot menu.
2. Save yourself from possible Screen Freezing:
In the grub boot menu, move down to Install Ubuntu and press “e” (Do not press Enter, this can lead to Screen freezing)

Now, find the line that starts with Linux and add nouveau.modeset=0 after quiet splash. Press F10 to boot. This disables the nouveau drivers of the Nvidia GPU on Ubuntu.
3. Installation:
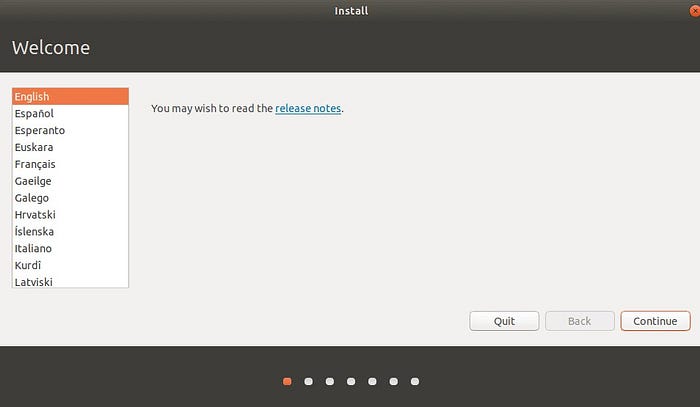
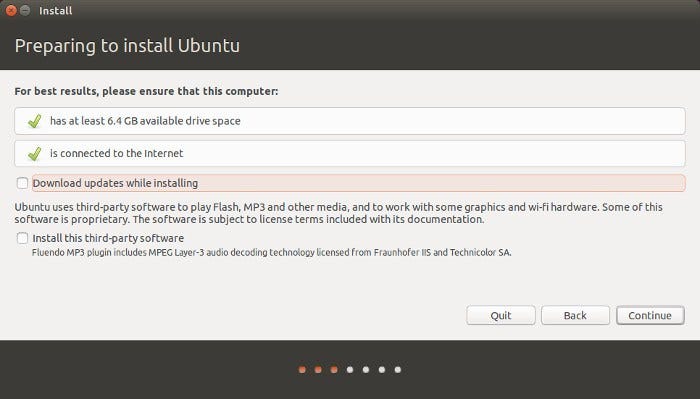
i) You will be presented with options to pick a language. Select the language and click on Continue.
ii) Select the installation options that you prefer and click on Continue.
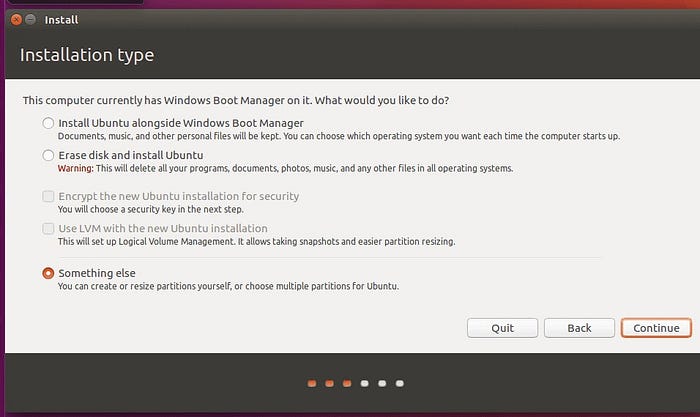
iii) You will now be presented with a menu for Installation Type. To manually allocate disk partitions on your Ubuntu, select Something else and Continue.
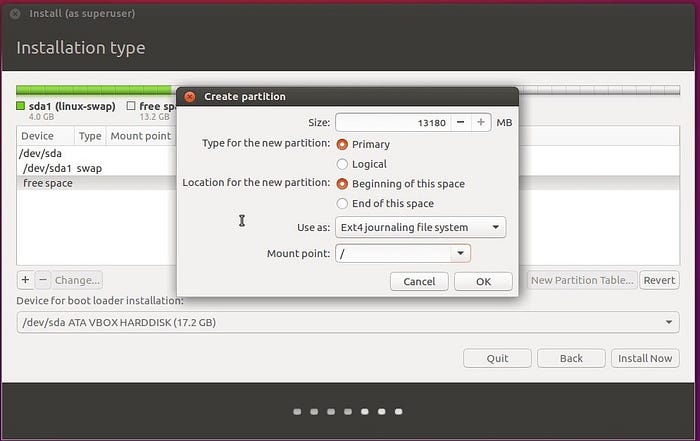
iv) Now, you need to allocate space for the root directory(/), the home directory(/home) and the swap memory. The free space we created in step 3 of part 1 will show up here. Select the free space and click on the + button.
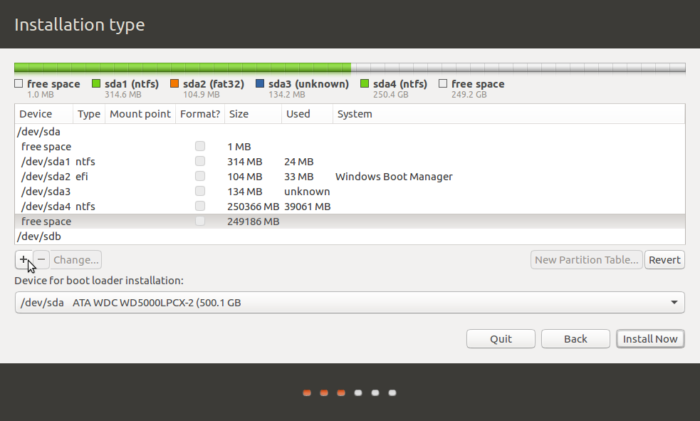
Root (“/”): This is where the Ubuntu OS would reside. The Nvidia driver software is pretty heavy and I prefer allocating at least 40GB for the OS to accommodate for the drivers post-installation. Sizes are to be mentioned in MB((x)GB*1024)
— Type of new partition: Primary
— Location of new partition: Beginning of this space
— Use as: Ext4 journaling file system
— Mount Point: /
Swap Memory: A good old rule of thumb was to allocate double the size of RAM to the Swap memory. But that doesn’t seem to hold good anymore as for a 16GB RAM, allocating 32GB for swap is a waste of space. It should be sufficient to allocate anywhere between 4 to 8GB of RAM for the swap.
Select the free space again and click on the+ button. Now, key in the size of swap and select Mount Point as swap area.
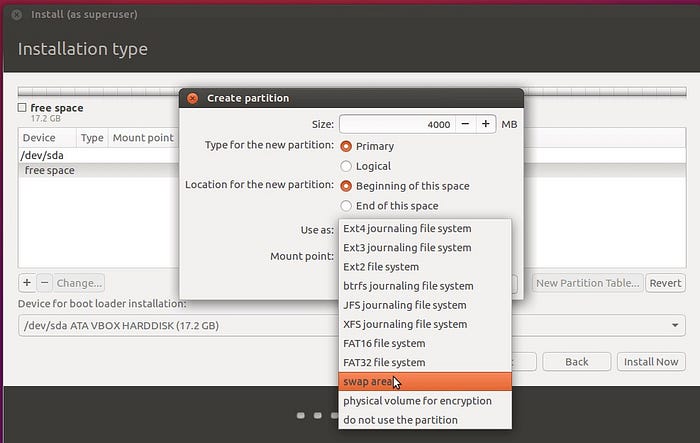
/home: This is where all your personal files, documents, pictures, videos are going to be stored. Allocate the rest of the entire free space to this directory following the above steps with Mount point as /home.
After setting up the three partitions, click on Install Now.
v) You will be asked to set your username and password. Once the installation is complete, unplug your bootable USB and restart your device.
PART 3: POST INSTALLATION
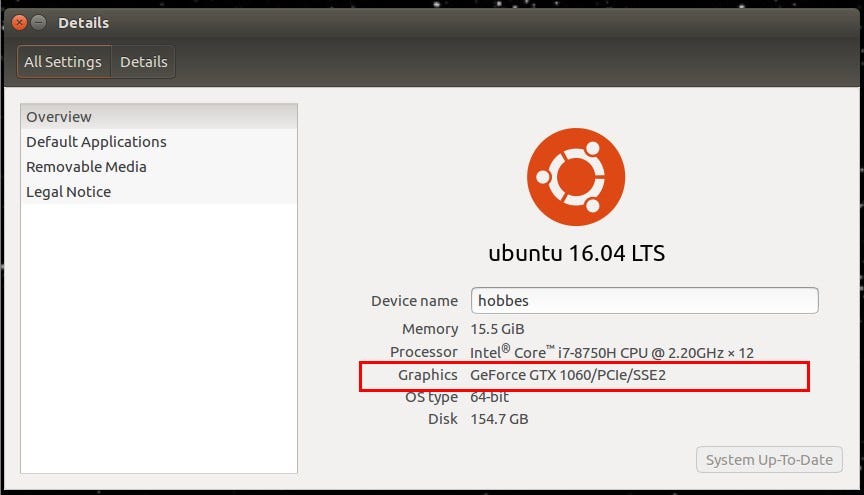
To get Ubuntu to use your Nvidia graphics card, we will need to install the relevant drivers. Without these drivers, Ubuntu will continue to use the Intel processor that is part of the CPU package and not the Nvidia GPU. To install them, open the terminal (Ctrl+Alt+T) and run the following commands sequentially.
sudo apt update
sudo apt search nvidia-* <check which Nvidia version “xxx” is supported>
sudo apt install nvidia-xxx <Ex: “sudo apt install nvidia-384”
After installation of the Nvidia drivers, confirm if Ubuntu is using the Nvidia graphics card on your device by selecting About This Computer in the Settings Symbol on the right top corner of the screen, it should be updated to the graphics card on your device.
Problem #1:
If you’re not greeted by the grub boot loader and are taken directly to Windows, set the boot order in your UEFI settings. On Windows, go to Troubleshoot > Advanced Options > UEFI Firmware settings. This will reboot your laptop and take you to the UEFI settings. Move to Boot tab and under the Boot option priorities move the Ubuntu OS to Boot Option #1.