GIT like a Boss
Hey everyone, today I’m going show you how to use GIT like a boss. Knowing the right way to work with this popular version control system can make your life much easier if you’re working on any type of file-based project that need version control. The great thing about GIT is that you don’t even have to be a computer geek to use it. So, let’s start. 😊

What is GIT?
Is a VCS (version control system) like others, such as Mercurial or Bazaar. A VCS is basically software designed to record changes made to a file, or a set of files, over time. This gives you the power of time traveling 😊. You have the ability to revert or recall changes to one file, or many files, after you’ve made them. You can compare changes made to files from one version to another and see exactly what was changed in each one. Git gives you the ability to see when a change was introduced or who made the change.
How GIT Works?
GIT treats the data as a series of snapshots taken over the entire project’s file system. Every time you commit or save the state of your project, GIT takes a picture or a snapshot of what your project looks like, including all of its files at that specific moment in time and then stores a reference to that snapshot.
You can recall any snapshot previously taken at any point and see the state of that entire project. If files have not changed for that snapshot, GIT is smart enough to not store that file again, but it links to that previous identical file that it stored during the last snapshot that file had changed.
One of the major advantages of GIT is the ability to function locally. Imagine working from home when your VPN fails to connect or you need to work on a plane where you don’t have access to the origin server. This would make life harder, don’t you agree? With GIT you can make the changes to your local repository of that project and then you simply commit your changes to the remote server when you’re connected back to the network.
The Stages of a File

Git has three main stages a file can occupy: Committed, Modified and Staged as you can see in the image above. A file that is in the committed stage means that the data is safely stored in your local version database with that project. When you make some changes to this file, the status of this file moves from committed (or unmodified) to modified and this means that the file has been altered from the last committed version that is stored. This is now the “work in progress” state. When you finish the changes, you move the file to the staged state. In this step, you’re telling GIT that you want to take the changes made for that file during the modified state and then commit them to your local database to be in your next commit snapshot. Note that these stages only apply to files that were in the projects last commit snapshot.
Basic Commands
Before I show you some the crucial commands of everyday use, you need understand that the term “origin” is the repository version that sits in your remote server such as GitHub/TFS/etc.
- git status
When you push your local repository to your remote repository, code in the two repositories should be the same. With GIT you don’t have to guess or try to keep track of the current state of your project or files. You can check the status of your project at any time by usinggit status:

The response from GIT shows we are on the master. Note that when you initialized your GIT repository, GIT created by default a branch called “master”. The second line in the response tell us that our branch is up-to-date with the origin master. So, it’s saying that our local branch master is
up-to-date with the origin master branch, the one being hosted on your GitHub account, for example. The final line tells us that there is nothing to commit and that our working tree is clean. The “git status” command is a simple, but important command, because it shows us the state of our project at this particular point in time.
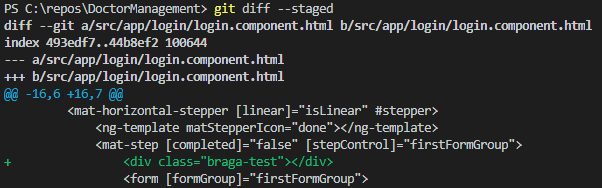
- git diff
This command shows us the changes in the code between the current “modified” version and the previous “commited” snapshot. If we want to see the changes, we have staged that are set to go into our next commit, we can use git diff --staged like this:
- git commit
This command is used to commit our changes. There are addition options that extend functionality of commit. For example:
→ git commit -a => The -a option automatically stages all changes in your working directory that are being tracked by GIT.
→git commit -m => Add a commit message like this:

We can see our comment in the GIT output showing our commit snapshot was successful. Our first commit is done 😊.
Advanced Commands
- git push => One of the advantages of GIT is that you can work locally and when your local project is at a point where you want to send your changes to your origin project, you can simply it upstream. You can send your changes to your origin project by using the git push command like this:

- git log => Returns information related to our previous commits and by default, the git log command lists the commits made to our project in reverse chronological order with the most recent commits will show up first, as you can see in the next image:
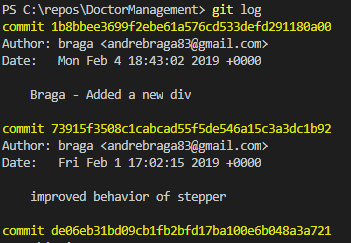
- git log -1 => Shows only the latest commit made.
- git log --oneline => Shows a list of our commits in a single line format. Each line in the response is a commit with the commit message. This is a great way to see a simplified high-level overview of all the commits in our project history.
- git log --stat => Give us a more detailed information.
- git log --patch => Give us the full diff of the exact changes in each file with each commit.
- git rm file_name => Tells GIT to stop tracking this file. Afterward, if you use the
git statuscommand, you will see that a deleted file in your staging code. When you commit again this file will no longer be tracked by GIT and it will be removed of your project. - git checkout branch_name => Switch from one branch to another.
- git checkout -b branch_name => Create a new branch and switch to it.
- git stash => “Stashes” your working code and returns the active state to the most recent commit.
- git stash pop => Restores the most recently stashed files.
- git stash list => Provides us a list of work in progress changes that we’ve stashed, along with the branch and some commit data.
- git stash show => Give us a better detailed view of what file was stashed and a high-level overview of the changes.
- git merge branch_name => Merge the branch that you reference to your actual branch. Imagine that you’re in
masterbranch, with this command you will merge the “branch_name” to yourmasterbranch. - git reset: Allows us to move commits from history back into our working or staging area. It can also be used to throw changes away. Note that this can be a destructive command, so be careful when you use this. Remember that you are changing your GIT history with reset command. It is a best practice not to reset changes once we’ve pushed our commits to our remote origin where other colleagues could have accessed the changes. We have three different options when using GIT:
→git reset --soft => Moves your commits back into your staging area. Helpful if you want to regroup these changes into different commits or add more changes before committing.
→git reset --mixed => This is the default reset option, if you write only git reset the behavior will be the same. It is similar to the --soft command but this moves the changes back to the working directory (local).
→git reset --hard => Moves the changes to the trash. This could be helpful if you’ve messed around with making changes and then you decided you didn’t want to keep anything and just start over. BE CAREFUL when using this. - git clone {url} => Clone a branch of your GitHub, TFS, etc.
- git config => Sets the author name and email to be used with your commits. Example:
→ git config -global user.name “André Braga”
→ git config -global user.email “andrebraga@portugal.pt” - git init => Create a new local repository.
- git branch -d branch_name => Delete the feature branch.
- git pull => Fetch and merge changes on the remote server to your local repository.
Conclusion
I hope that this article can be helpful for you. We have just scratched the surface of the power of GIT, but my goal with this piece was to provide you with the fundamentals of GIT to get you started. I hope thath this article motivated you to learn even more to use GIT like a boss 😊.
HINT: I highly recommend that you have a look at this document from Chris Beams that shows you how to write a git commit message. So, my last advice is: Go to this github project and try hands on every command that you learned today. I love this tool and I think that you will appreciate it.


