Task Management Application using Vue.js — Part 2
Introduction
In Task Management Application using Vue.js — Part 1, we discussed how to breakdown larger user interface into smaller components along with top-down and bottom-up approaches. In addition, we discussed how to build reusable components using slots and usage of Vuex in the context of the application.
In this article you will learn,
- How to implement form validation
- Creating and using Vue.js Plugin
- How to optimise your app bundle for production deployment
- Where and how to deploy your app
What We Will Be Building
Here is the screenshot of the completed app.

Application Demo
- On surge.sh — http://kanban-board-demo.surge.sh
- On netlify.com — https://task-management-app.netlify.com
Github Repository
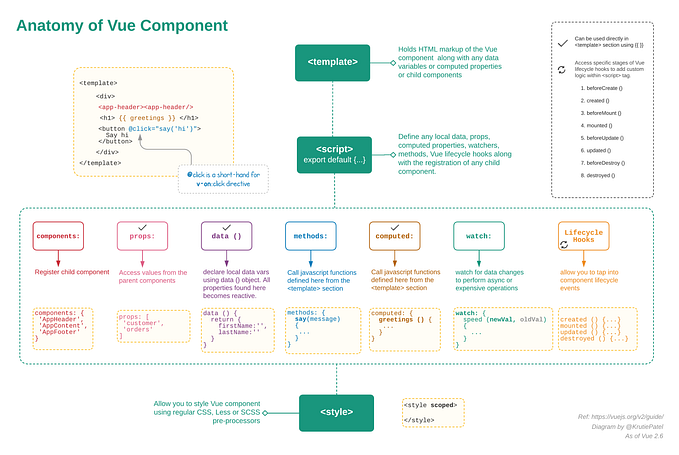
Form Validation
Form validation is always a tricky bit in any application and it can be done in many ways. For simple scenarios, you can even write your own form validation functionality, but it becomes tedious when you have to do that at multiple places in the application.
To address client-side form validation, there are well-tested libraries exist in Vue ecosystem. Libraries such as Vuelidate, Vee-validate are quite helpful in integrating form-validation with only few lines of code.
To implement form validation in this app, I have used Vee-validate library. The easiest way to setup Vee-validate is to import and register with Vue using Vue.use() convention as seen in code snippet below.

The above code will import and register all validation rules, mixins and locale’s from vee-validate library. Note that, this approach will increase the size of final JavaScript vendor bundle of the app.
However, while researching I have found in documentation of Vee-validate that I don’t have to import the entire library, instead I can only import necessary functions, validation rules, and locale for validation messages to keep the bundle size small. I’ll go over this setup in Bundle optimisation section.
We are using forms for the following operations,
- Create and update the task board
- Create and update the task list and
- Create and update the task list item
Let’s see the usage of vee-validate in TaskListEdit component below.

In TaskListEdit component, we are using the required rule with v-validate directive. Note that, we are using the validation rule directly in the template with vee-validate directive (i.e vee-validate="'required'"). Therefore, we have to wrap the required validation rule with single quotes.
If you prefer, then you can also use an object format to write the validation rule. In that case, the syntax would be like v-validate="{ required: true }".
Object syntax provides a much cleaner approach when you have more than one validation rule or you want to dynamically add or remove validation rules to the form. You can read more about syntax in vee-validate documentation.
Apart from vee-validate directive, we are also using data-vv-as attribute to provide readable name of the field (ie. List Name) used to display validation error. Note that, the data-vv-as requires name attribute in the input field to work properly.
We are using small html tag with errors.first("fieldName") to show validation errors for a field. errors object is provided by vee-validate library to access validation errors. Below is the syntax to show validation error.
<small class="text-danger" style="display: block">
{{ errors.first("fieldName") }}
</small>
Finally, we are changing the default behavior of the Save List button using prevent modifier on @click event, that will prevent the form submission and full page refresh when the button is clicked.
Now, that we understood the markup needed to make vee-validate work. Let’s take look at handleTaskListSave method in the component.
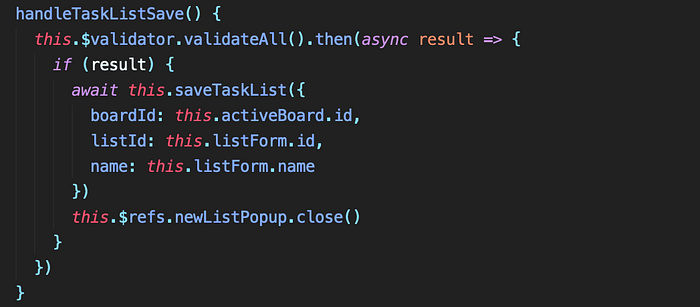
Since vee-validate is imported and registered globally, it’s promise-based validator API is available to all the components. The above snippet of code is validating the form and then providing validation result through result parameter for further processing.
If validation passes, then we are calling saveTaskList Vuex action with all necessary data and then closing the popup. And if validation fails, vee-validate will show the errors in the form and the popup will stay open.
That’s all we need to do to validate forms using vee-validate.
Vee-validate is a great client-side validation library with extensive documentation and working samples on codesandbox. It is CSS framework agnostic, so you can display errors however you like. All in all, it makes form validation fairly straightforward with very little modifications to the markup.
Client-side validation provides better user experience; however, it is not an alternative to server-side validation. Therefore, you must validate user-submitted data in the backend before saving it to the database.
If in case, you are building a multilingual app then it is pretty straightforward to wire-up vue-i18n plugin with v-validate to show validation messages based on configured and supported locale by the app. You can use dictionary api to provide custom validation messages. Read more about that in the vee-validate documentation.
There is a final piece of puzzle remaining in the app, that is to enable and disable features by device detection. So let’s discuss it in next section.
Device Detection
You can use CSS media queries to detect a device viewport in Vue component <template>. However, it gets a little tricky when it comes to detecting a device in Vue component <script>. Now, imagine if you need to detect the device at few or more places within the app.
You definitely do not want to replicate the logic everywhere or even if you extract the logic in a script then still you’d need to import the script at multiple places. That’s where Vue.js plugins come handy.
By the definition, Vue.js plugin adds certain functionality that is available globally. A Vue plugin can add,
- Global methods or properties
- One or more global assets like directives/filters/transitions etc
- Component options by global mixins
- Vue instance methods by attaching them to Vue.prototype
A Vue plugin can be a library that provides an API of its own, while at the same time it can inject all or some combination of the above.
In our case, I wanted to detect the device (desktop, laptop and mobile) and based on that enable and disable drag/drop functionality in the app.
To implement device detection, I have borrowed the code from nuxt-device-detect plugin and created a vue.js plugin with few modifications.
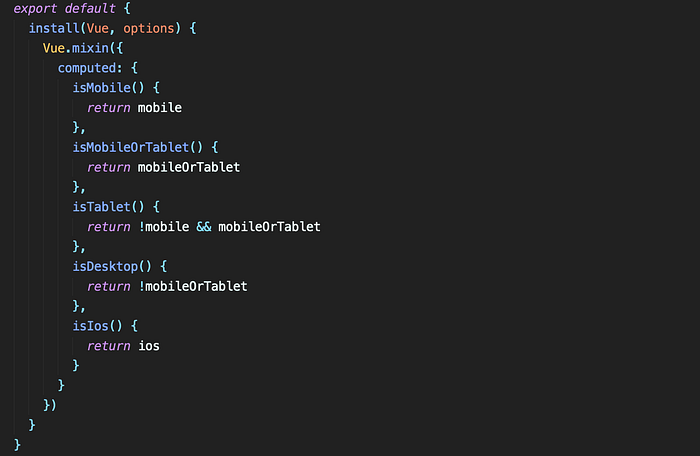
In the above code snippet, the plugin registers a mixin with Vue instance and provides isMobile, isMobileOrTablet, isTablet, isDesktop, isIos computed properties that will be available to all components.
// plugins/index.js
import Vue from "vue"
import DeviceDetect from "./device-detect"
Vue.use(DeviceDetect)
The above code snippet imports and registers DeviceDetect plugin using Vue.use(DeviceDetect) syntax.
Now that we understood how to register a plugin, let’s see how we can use it to enable and disable the drag-n-drop feature in our app.

In above snippet from TaskBoard component, I have used disabled property of draggable component to enable and disable drag-n-drop behavior. shouldAllowListOrder computed property is using isDesktop and isTablet computed properties which are made available by device-detect plugin.
If the user is on desktop or tablet device then shouldAllowListOrder property will return true and otherwise, it will return false, and that makes drag-n-drop feature enabled or disabled based on the device.
We are using a similar concept in TaskList component as well to disable drag-n-drop of items on mobile devices and enable it on desktop and laptop devices.
Testing feature on devices
The quickest way to test this feature locally on devices is to run your project using npm run serve as shown in the screenshot below and use Network URL on your desktop, tablet, and mobile devices. That’s the easiest way to test out device-specific features locally before deploying the project online.
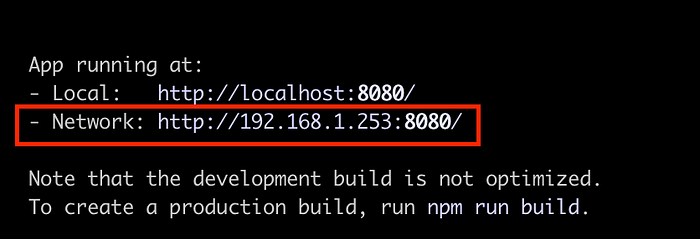
npm run servePlugins are quite powerful, as they can make certain variables, computed properties or even methods available to all the components across the app.
In this app, device detection functionality provided a perfect use case for a custom plugin, but you can also use plugins to make external libraries such as axios.js, moment.js etc. available to all the components as well.
Now that we have covered all the necessary concepts used in this app. Let’s discuss bundle optimisation.
Bundle Optimisation
Building apps using Vue is pretty straightforward and with the availability of many component and utility libraries, it is always a temptation to quickly install and use them straightaway.
However, before using any component or utility library, you should always consider its impact on overall bundle size and find ways to import and register only components or functions needed by the application.
Although, there are various ways to optimise the application bundle, however in context of this app we will look at the following,
- CSS bundle optimisation
- Vendor bundle optimisation
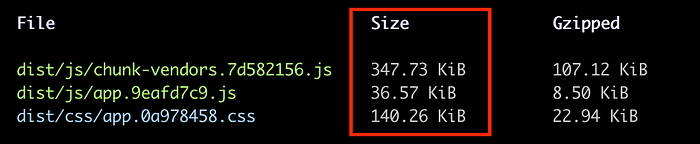
For example, without any optimisation, when you build the application using npm run build then the overall bundle size of the app comes to ~525 KB before Gzipped.
Now let’s see how can we optimise CSS bundle.
CSS bundle optimisation
The packaged CSS of the app is ~140 KB in size. That is because we are using Bootstrap CSS Framework v4.3.1 and without any optimisation, CSS bundle will include entire CSS framework.
We can use purgecss and postcss-purgecss packages to remove unused classes from the CSS bundle. purgecss works perfectly with postcss library which is used by Vue-CLI internally.
purgecss and postcss-purgecss packages should be installed as a development dependency to ensure they are only used to build the app.
$ npm i -D purgecss @fullhuman/postcss-purgecssAfter the installation, I have modified postcss.config.js in the root folder to configure postcss to use purgecss and keep only used classes and strip out the rest from the final CSS bundle.
const purgecss = require("@fullhuman/postcss-purgecss")module.exports = {
 plugins: [
  //Only add purgecss in production
  process.env.NODE_ENV === "production"
   ? purgecss({
      content: ["./src/**/*.vue"]
     })
   : ""
 ]
}
The above code ensures that purgecss will only run in production mode and it will check all .vue files for CSS classes and exclude any unused classes.
Now after configuring purgecss, when I build the project using npm run build, then the CSS bundle size is cut down to 13.08 KB from 140.26 KB.
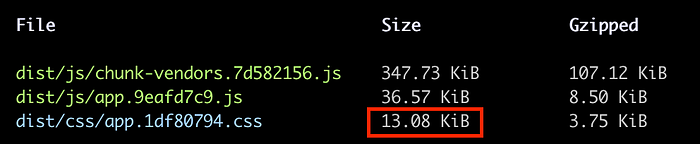
That is the huge saving of ~127KB in CSS bundle size alone!
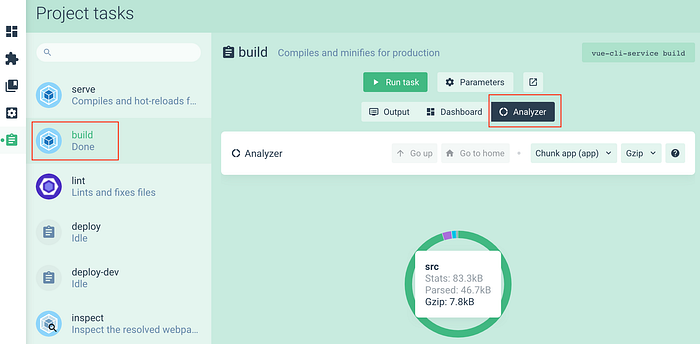
But still our JavaScript vendor bundle size is a bit larger, so I have used app bundle analyser to find which libraries are responsible for bigger JS bundle size. That way I can research and figure out how to reduce their footprint in our app.
Vendor Bundle Optimisation
After looking at vendor bundle in analyser, I figured vee-validate library is included in its entirety. When we import and register Vee-validate library using the following code and it includes the entire library in the vendor bundle.
But, there is a better way to include Vee-validate in our app. I have created a separate plugin file to keep the code organised related to vee-validate imports and registration.
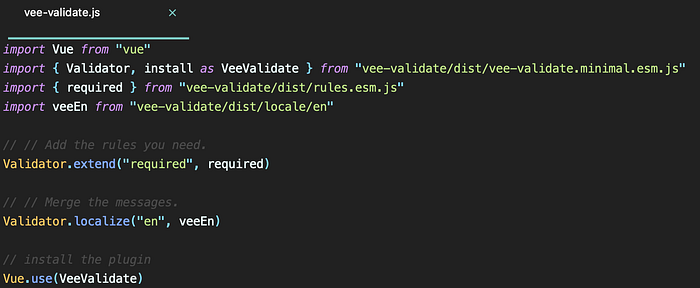
In above code, we are only importing Validator and install methods from vee-validate.minimal.esm.js and then again only importing required validation rule from rules.esm.js. Instead of importing all defined locales, we are specifically importing en locale for validation messages.
After the imports, we are simply wiring up validation rules and locale with vee-validate and finally registering VeeValidate with Vue by using Vue.use(VeeValidate) command.
Now, let’s run the build one more time and see the difference.
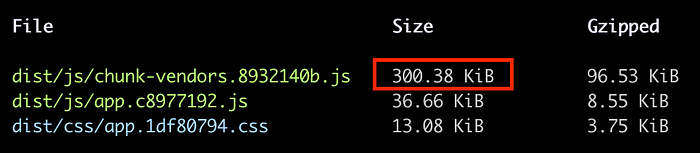
After vee-validate related optimisation, our vendor bundle size has gone down to ~300 KB from ~347 KB. That gives us the saving of ~47 KB in vendor bundle size.
Comparing to where we started with overall bundle size of ~525 KB, we have now reduced the overall bundle size to ~350 KB.
After the optimisations, we have saved ~174 KB in overall bundle size and that will definitely make our app load faster on slower connections.
Quite often while building an application, bundle optimisation stays as an after-thought i.e something that needs to be done after the app is built. That often leaves us with bigger app bundle size and towards the end, it becomes lot harder to optimise.
Therefore, smart developers monitor the bundle size from the beginning and even encourages team members to import specific functions or components rather than importing an entire library. That keeps bundle size in check right from the start and enables them to ship quality and high-performing app.
Deploy Your Application
While you are developing the app, you may want to deploy it to the dev or staging server to test it out. At that point, you have the option to deploy the app to your private web hosting server or use a cloud hosting services such as Netlify, surge.sh, heroku, zeit.co , amazon web services or even azure.
In the context of this app, we will discuss application deployment to Surge.sh and also walkthrough the Netlify continuous deployment setup.
Keep in mind, Surge.sh is purely a platform to deploy static websites or apps. While, Netlify has much richer set of features such as Continuous deployment, Forms, Global CDN, Serverless functions and much more.
Deploy to surge.sh
If you have not installed surge, then I recommend you to install it globally so that you can deploy any vue.js app to Surge.sh easily.
// To install surge globally
$ npm install -g surge
Once you have installed it, then run surge login in terminal to login or create your free account.
To streamline quick deployment from the terminal, I have put together few additional commands (deploy and deploy-staging) in package.json to build the app and then deploy to surge.sh seamlessly.

deploy npm command will build the app using vue-cli-service, switch to dist directory and then use surge CLI command to deploy the app to Surge.sh. You can run following command to deploy your app.
$ npm run deploydeploy-staging npm command does exactly same thing, except it is configured to deploy the app to different URL.
npm run deploy-stagingNote that, you would need to change the deployment URL’s. If you want to deploy to surge.sh.
Continuous deployment setup with netlify
Deploying to Netlify and setting up continuous deployment for your app is super simple. Continuous deployment with Netlify provides most friction-less and extremely productive workflow to build an app.
With continuous deployment, Netlify will setup webhooks with your chosen Git Provider (Github, Gitlab, BitBucket) to receive notifications about commits in your online Git repository.
When you push a new commit to an online git repository, Netlify receive notification from webhook/s, which triggers Netlify bots to pull your latest code and then build and deploy the app.
This is a one-time setup and provides streamlined deployment of your app and even makes the process of application development enjoyable.
Steps to setup continuous deployment
Before moving forward, ensure that you have created an online repository on Github, Gitlab or BitBucket and pushed the latest code to the repository.
Now, head over to netlify.com and create your account. If you have existing account, then feel free to skip this step.
After you have logged in on Netlify, you can use New site from Git button to create a site from your repository.
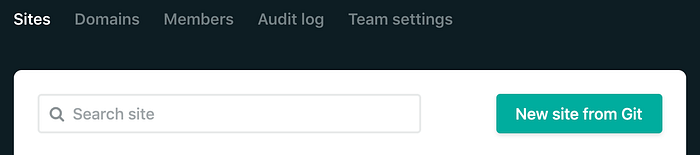
New site from Git ButtonOnce you click the button, then Netlify will guide you through a three-step process to set up your site.
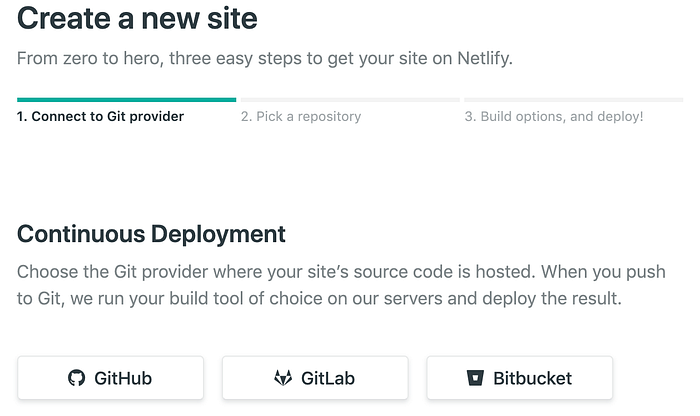
Step 1: Connect to Git provider
In the picture below, you can choose a Git provider where you have created your code repository. Netlify will then authenticate with Github provider and ask for your authorisation with necessary permissions.
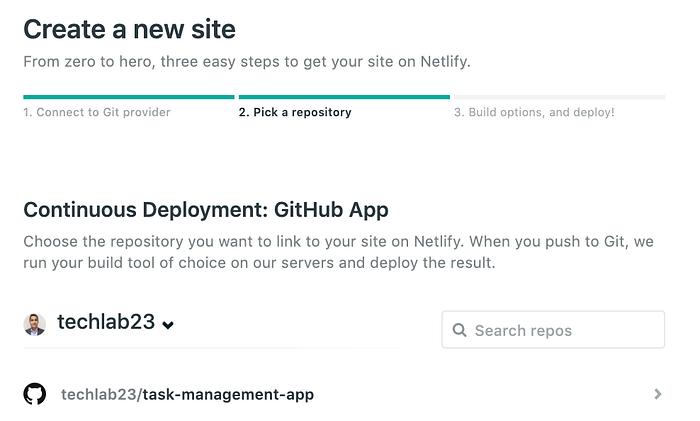
Step 2: Pick a repository
After you have authorised Netlify, you can pick the repository you wish to deploy. In my case, I have chosen task-management-app repository.
Step 3: Build Options and Deploy
In this step, we will configure the continuous deployment build settings.
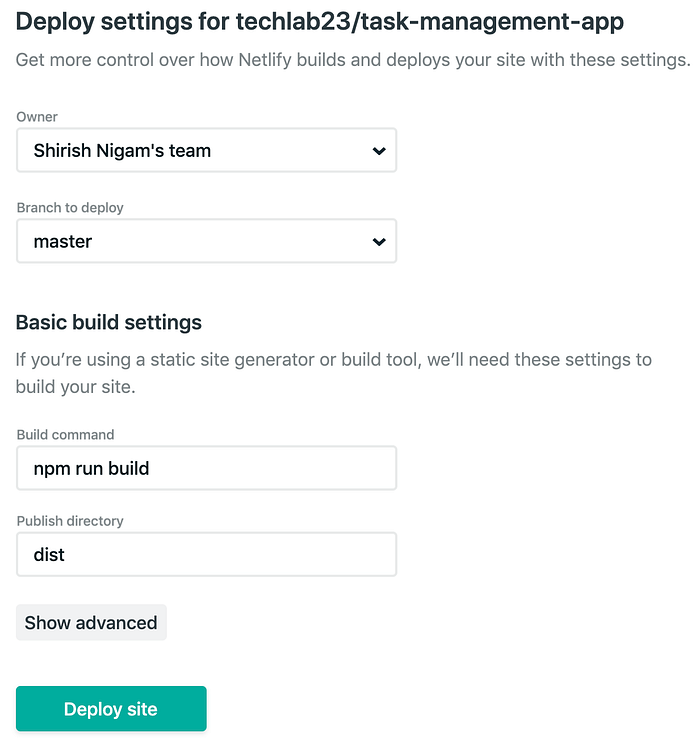
You can select the branch you want to deploy. By default, Netlify considers master branch as production. For the build settings, I’m using npm run build as the build command and using dist folder for deployment.
Once you complete this step, then Netlify will setup webhooks to perform the following actions in this exact order.
- to receive commit information from the Git provider,
- to pull your code from Git repository and build it and
- to deploy it to the new site with randomised name.
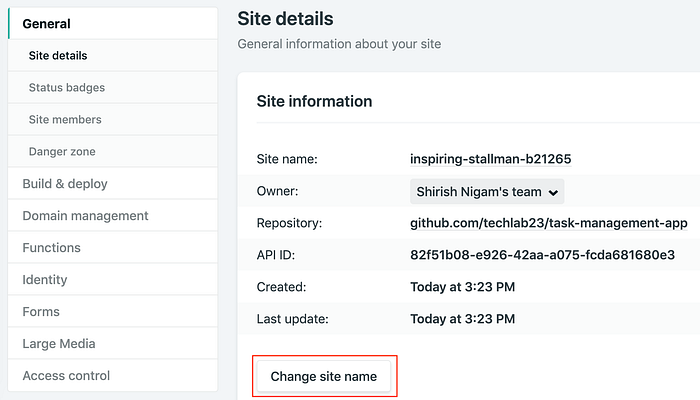
Change site name
To give a more meaningful name to the site, You can go to the settings->site details section and click on Change site name button.
That’s all you need to do to setup continuous deployment with Netlify.
Now every time you push a commit to the master branch the Netlify will pull, build and deploy your app automatically.
Deploy another Git branch
There are cases when you work in another Git branch (e.g development or staging) and want to deploy and test first before pushing into production branch, then you can setup continuous deployment for individual branches of the project as well, as shown below.
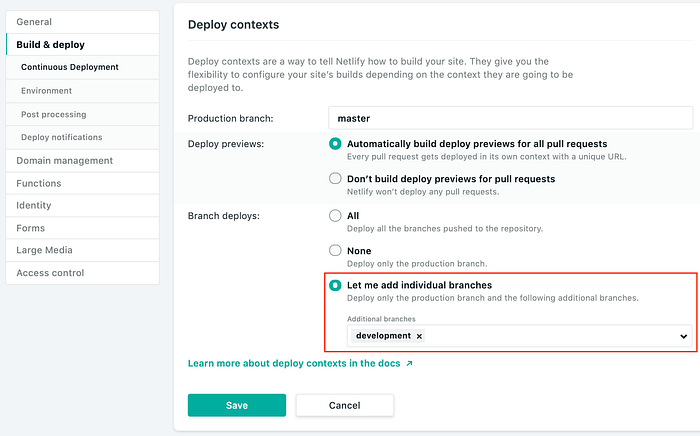
After setting this up, when you commit to development branch, Netlify will pull the code from the development branch then build and deploy it automatically for you.
Based on the configured site name and chosen branch, you will get site URL for the branch. The site URL for the branch follows a certain format.
https://<branch-name>--<site-name>.netlify.com
For example: If your branch name is development and site name is task-management-app , then the deployment URL will be,
https://development--task-management-app.netlify.com
Build configuration through netlify.toml
Apart from providing build settings while creating a site, you can also create a Netlify configuration file netify.toml in the root folder of the project. This file is used to override build and deploy settings and provide additional site configuration settings to Netlify build-bots.
Here is the example of the netlify.toml file used in our project.
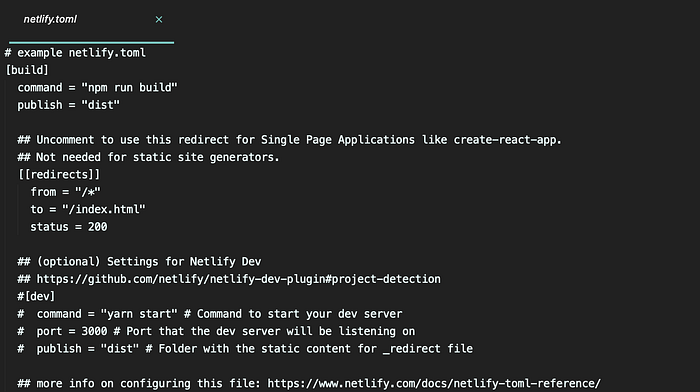
In netlify.toml file, we have build and redirects sections. In the build section, we are providing a command to build the project and publish to provide the directory to publish.redirects section is used to define redirect rules for the website. Here is the documentation on netlify.toml file.
Application deployment on Surge.sh is super simple and it is great for static sites, personal portfolio, prototypes and demos etc.
In contrast, Netlify offers a complete platform for your apps with far superior developer experience. Netlify is suitable whether you are developing a hobby app or an enterprise grade application. After deploying this application on Surge.sh and Netlify, I enjoyed the seamless developer experience offered by Netlify with continuous deployment of the app right from the Git repository.
Conclusion
In this two-part series of articles, we learned about behind-the-scene processes and techniques of designing a complex user interfaces, with couple of approaches to breakdown the larger interface into smaller specialised and generic/reusable components, which helped us building the application in phases. We also learned, how important is it to think about the responsibility of each components because quite often, the responsibility of the components satisfy a feature in the application.
When we needed the application data to be shared among multiple components, we used Vuex to manage application-wide state of the shared data. In addition to EventBus pattern to simplify component communications throughout the app, we also used slots to build reusable components.
In context of the application, we discussed the implementation of drag-n-drop feature, form validation using Vee-Validate, custom Vue.js plugin for device detection, bundle optimisation and an application deployment to Surge.sh and Netlify with continuous deployment pipeline to streamline development workflow.
While all the key front-end features are implemented in the application, you can add more features — such as image upload support in a task-item, allow storing priority tag of the task, sort by dates or priorities, etc to name a few — to extend the application and even develop the back-end of your choice for this app to connect with the database.
If you have missed the link to the code of the app above, here is the Github Repository .
If you are a beginner and want to understand Vue.js better, then read Thinking in components with Vue.js .
Since this article is not a part of medium’s metered paywall, please help me reach more people by sharing it in your network and if you are feeling generous then give this article more claps.
Also don’t forget to follow me on twitter @_shirish .